Storage is a problem for all of us. Andy Lucas uses the Triton Finger Joint attachment to create useful magazine storage boxes. This is an excellent project for those people just starting out with their woodworking. 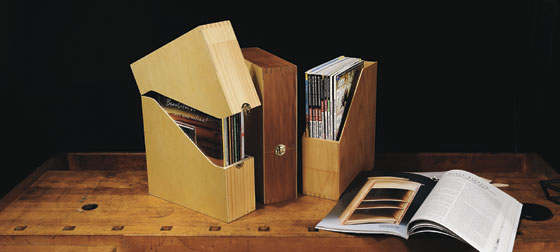 |
Over the years I have collected my fair share of woodworking magazines, many I keep for reference material or just to have a good read from time to time. It’s been a challenge to store and file them in a convenient manner. There are many ‘magazine’ boxes on the market made from a variety of materials – plastic, metal, cardboard, timber etc – all too expensive for what they are or inappropriate for my requirements.
Project ‘Magazine Storage Box’ is the result of my own solution to my problem of storage. I have made over 20 of these boxes and they now store my wood magazines, old souvenir sporting programs, selected travel brochures, woodwork plans etc. I keep some in my workshop for easy access to current projects and reference material. The majority of them I store in various bookshelves in the house. To ensure I don’t scratch the shelves I glue a thin layer of feltex to the box bottom.
I make two styles of magazine storage box, one basic design with open top and also my preferred style with a hinged lid. In these instructions I will show you how to build the ‘hinged lid’ version.
This project is constructed using a Triton Finger Jointer attachment on my Triton RTA 300 Router Table. (It could also be constructed using your choice of dovetail joints, butt joints, etc)
Materials: - 90mm x 10mm pine boards for box frame
- 3mm ply for side
- Section of Piano hinge
- Titebond II PVA Glue
- 12mm brads
- Danish Oil
Cut List: (Box frame timber mentioned is a guide only. Some of my boxes are made from 140mm x 12mm boards) - 2 box Frame pieces 335mm x 90mm x 10mm
- 2 box Frame pieces 280mm x 90mm x 10mm
- 2 x 3 ply box sides 335mm x 280mm
Step 1.
Ensure all box pieces are cut accurately to length and perfectly square. Ensure box frame timber is exactly the same. 90mm width for the full length of each box frame board. Step 2.
Set up Router Table, and fit ¼ inch router cutter. I prefer a Spiral upcut bit to ensure a clean entry and exit cut. Adjust cutter height to ½ mm above thickness of box frame timber.
Step 3.
Set up Triton Finger Jointer as per instructions in “Triton Finger Jointer Manual” Step 4.
Clamp all 4 box frames and offset as per instructions in manual. Check that box frames are absolutely parallel to each other and clamped square to table top. Cut finger joints as per instruction manual. It is probably worth preparing a trial joint with waste material to ensure all Finger Jointer adjustments are accurate and finished joint will be neat and precise. Step 5.
After cutting one end of box frame fingers, invert frame pieces, align, reclamp and proceed to cut other ends. Step 6.
Remove clamped box frames from Finger jointer and check that all fingers have been cut through. Remove clamps and ‘Dry Fit’ box frame prior to gluing. (Make minor adjustments with paring chisel if required) Step 7.
Glue and clamp box frame. I use 2 x Picture Frame strap clamps. I also use small spacer strips at each corner to allow the slightly over length box joints to pull up tight. Step 8.
Sand/Trim exposed ends of finger joints. I use a linisher with a 6 inch belt (Model SB-609) You could also use a router flush trim bit or use your hand skills with a block plane. Step 9.
Fit 3 ply sides using PVA glue and 12mm brads (Air nailer or bullet head brads suitable) Step 10.
Trim Excess ply on linisher or with Flush Trim router bit Step 11.
Oil or lacquer with your preferred material.
Step 12.
Mark a cut line for removing Box lid. I mark 130 mm from bottom at front and 80mm from top at back, then I draw a line 40mm square across from these marks on the ply sides; then use a steel rule to mark a line to join these 2 points. Step 13.
Cut along this line with your finest tooth band saw blade (or Jigsaw cut from both sides of box) Sand ply edges along cut line. Step 14.
Align and fit 90mm length of piano hinge to back of box. Note clamping set up holding box in correct alignment. I also fit a small Brass Catch to front of box using similar clamping process. I use a Vix number 3 bit to ensure I centre the hinge and catch screws correctly.
Step 15.
Give finished Magazine Box another coat of Oil etc if required. I normally make 2 or 3 of these at a time while the tools and machines are all set up. A good opportunity to make a practical item and also practice using a number of your workshop tools and skills. Good luck with your project. |