Setting Up a Lock Mitre Bit - by Carol Russell
Router bits open up a world of joinery possibilities. There are hundreds of joints that can be cut using them, but some are more approachable than others. Of all the router bits that we stock, the large CMT lock mitre bit can be one of the most daunting to use and is tricky to set up. However, the joint it creates is virtually indestructible and can be used both as a means to join mitres and parallel glue joints. It is excellent for use on solid timber and man-made products like MDF, as it gives you enormous glue surface area.
Although the instructions sound simple, experience tells us that there are a few things that are helpful to know. Firstly, it’s essential that your router table is flat and the fence is at 90° to the table surface. Like any mitre that you cut, everything must be square. I recommend using a fence of about 150mm in height for support. As this is a very large diameter bit, it is best to run it on a low speed, around 10 000 RPM. If the bit is running we ll and you feel the cut could be a bit cleaner, it can be increased a fraction but err on the side of caution. Don’t machine timber that’s too narrow. Cut it wider and rip it down after machining. The vertical pass, particularly, can be very dangerous on narrow stock.
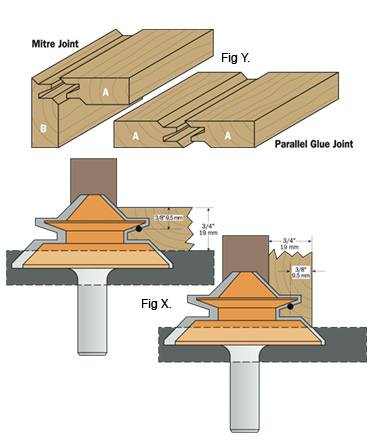
Mark the centre of your material with a marking gauge, (Fig.2) this mark needs to be lined up to the centre of the bit as is shown in Fig X. This can be a bit difficult as the bit centre is located about half way along the bottom of the cutter finger. A height gauge is useful for pinpointing the centre although you will still find there is a degree of trial and error involved so be prepared to make a few sample cuts. Once you have your lock mitre joint how you want it, keep your sample as a set-up block for that material thickness next time.
Mark out the sides of your box with the most decorative sides facing out (Fig. 1). The A pieces are machined horizontally with the face up. The B pieces are machined vertically against the fence with the face out. (Figs. 4 & 5)
Don’t try and machine the full profile in a single pass. Three to four smaller passes will give you a cleaner cut and is much safer as there is a lot less resistance against the material than with larger cuts. The depth of cut is controlled by moving the fence out, away from the cutter to increase the amount being removed.
Once the full lock mitre joint is cut check it for accuracy, you will probably need to adjust the height a fraction. If the horizontally cut piece (A) is too forward, raise the router bit by about half the error. Lower it if the vertically cut piece (B) is prominent.
To cut parallel glue (Fig. Y) the set-up is the same, but all timber is cut in the A position, flat on the table surface. The joints are then matched by reversing them to one another. Be mindful that the first piece is machined with the face edge up, but the second cut is with the face edge down.
After some initial trial and error, the lock mitre bit is sure to become a much-used addition to your tool cupboard.