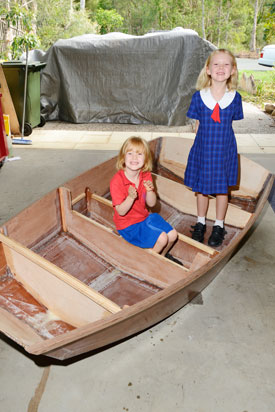
"My D5 Dinghy is still a work in progress. It’s coming along well, despite a steep learning curve. Here is the story so far".
 | |
The interest in construction of boats on a small scale followed on from my dad. I still vividly recall Tradewind a striking Blue and Red, painted, balsa 70’s style cabin bay cruiser boat that resided at our home until “I imagine” some inexperience skipper brought the vessel to an unfortunate end. Needless to say 30 years on there is no evidence of the boat but the spark of adventure still remains.
This brings me to my first attempt at building a full size dinghy. I decided to be ambitious and go for the sailing version. Who hasn’t dreamt of building a boat that they can sail with their kids. There are however, a few things to consider before you rest on a model or style, these can evolve a bit during the process, but the keys things are the following:
• Space available to construct the boat
• Purpose
• Resources - finances and tools required
• Experience or ability.
The Plans will either perplex or excite you, once they’ve arrived you can start from scratch. Often kits are available which include a everything from the basic supplies to the complete requirement to fully complete a craft.
I decided on a versatile little dinghy that can be used for rowing sailing or small motor, constructed from plywood. This particular D5 model can be assembled without the need for a strong back construction frame.
I sourced the Ply and other immediate essentials from Boatcraft Pacific I found that by avoiding the generic plywood supplies I was able to get sound advice without the confusion. Your local boat supplies can help you with a variety of ply depending on its purpose.
To Make A D5 Dinghy - You Will Need: - Plans - I purchased mine from www.bateau.com
- I needed 2 ½ x 6mm sheets and one 10mm sheets of ply.
- Saw (handsaw jigsaw) or a combination of table etc(some straight cuts not many)
- 1 metre rule
- Tape measure
- Large square 600mm x 400mm (handy but not essential)
- Pencil (regular and red / white if on hand)
- Conduit or similar flexi-edge (for long curve marking)
- Hand drill and small drill bit(size dependant on wire or tie) not necessary if taping.
- Copper wire or zip ties or duct tape
- Masking tape
- Epoxy (work out what type your after, quick, slow)
- Mask(dust chemical)
- Disposable gloves
- Fibreglass tape (scissors)
Consumables such as paint brushes, mixing cups, sand paper - not too course not to fine. Finer for between coats, courser for shaping and stock removal:
• Chisel
• Hand plane - Be sure to keep these sharp, the ply really dulls the blade due to the bond between layers.
• Drop sheet during epoxy can help keep the floor free of muck but can be a bit of a hassle too.
• Broom or vacuum. A tidy wor space is a better workspace and prevent accidents from occuring.
I realise now that specific knowledge is quite helpful. I wasn’t as willing as I should have been to seek outside help. I didn’t realise how many resources are out there. As the last couple of months have past I become more aware of the many people in different states who could have either helped with info or directed me to someone who could.
At the bottom of the article you can find links and references to a few organisations that I found very helpful.
This is a first hand account of my dinghy construction. You may be able to learn a couple of things from my mistakes and you may not, but I’m happy to say at the end of this, I got better the further along I went and I learnt a couple of things about timing and how not to do things.
There are a few things I would have preferred to happen, but we all ‘work and learn’.
Overview of Construction Steps:
Draw, Cut, Drill, Stitch, fillet, Tape, Prep Outer, Tape outer, Lid Seats, Tape Seats, Rub rails Knees and Oarlocks, Sand, Paint. Step 1: Loft Out The Plans. This entails marking or plotting the measurements onto the sheets of ply. Take your time and check again, after that Check Again!! I decided to make some templates to start with and guess what? There was one or two that I needed to recut, which was handy in some respects but I did waste time. There are a few things to be mindful of - Photocopied plans can have a few percent size discrepancy. A large square is most valuable and you need a long (2.5mtr) bendy thing such as 19mm PVC conduit. Step 2: Cut The Plywood This involves cutting out the boat parts from the sheets of ply. The main body, as in the hull and floor are taken from the 6mm stock, I also used this for the middle seat tops.
I figured with the daggerboard trunk ( for the sailing option) it would be strong enough with the thinner material. As per the instructions, all the frames including the front and rear transoms are to be taken from the 10mm ply.
Note: If I hadn’t decided to make the sailing version I could have gone without the extra sheet. With another ½ sheet it is really straight forward to get all the required pieces.
I was able to use a combination of saws and this was helpful but not necessary, for speed and versatility a jigsaw would be best (I didn’t have one). A band saw was helpful for a low effort accurate cut. I also use a Japanese pull saw and found the accuracy and action allowed me to get right next to the line and follow it without trouble. Even for slight curves but this can lock up the saw action a little. Step 3: Drill and Stitch. This is a method of bring the panels together prior to gluing, very tricky to turn the hull over by yourself I recommend a neighbour, partner or friend. This process is simple enough in theory, keep the holes evenly spaced at 100mm and at 10mm from the edges. The spacing is fairly important as you need to keep the panels aligned. I used a piece of scrap timber to drill through into, this saved large splinters of tear-out in the exit side or the ply (even quality ply has a tendency to tear on the thin laminations).
The centre bottom of the hull was easiest as it can be laid L & R together for drilling, the L & R sides can also be done in this fashion as long as you do the same spacing with the corresponding edges. I was thinking of the clear finish when I decided first with the copper wire and thus smaller drill holes 3mm. Part way through I changed to zip ties and 5 mm holes, I found I couldn’t get the torsion required for holding some of the edges together. I found filling the larger holes was easier.
This process may also be done with duct tape. Step 4: Internal Fillets And Fibreglass Tape 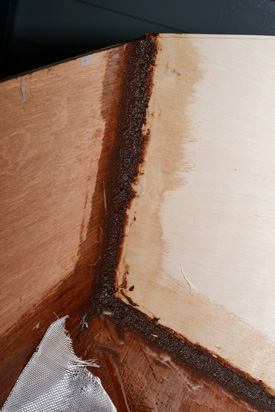 | |
Cut the fibreglass tape to size for all the corners to be joined in one section (box) at a time.
The putty and taping is the longest process and the messiest. I had to get my head around the difference between mixing a paste for the filler and the correct consistency of the paste.
I mixed up the epoxy and then added a little filler, little being the optimum word. Then I attempted to apply this runny cream-coloured “thick” solution to the centre bottom of the hull.
Before I knew it, I noticed the mix had a tendency to sink through the holes. It was way too thin.
I found that before applying the filler, I needed to give the joint a small touch up with the straight epoxy. This gives the edges something to soak into and seal the fibres.
I learned that you need to mix the filler to a peanut butter-like consistency, this will still sink a little, so you will probably need to masking tape the underside beforehand. Use a tongue depressor or similar radius tool to shape the filler into the corners. 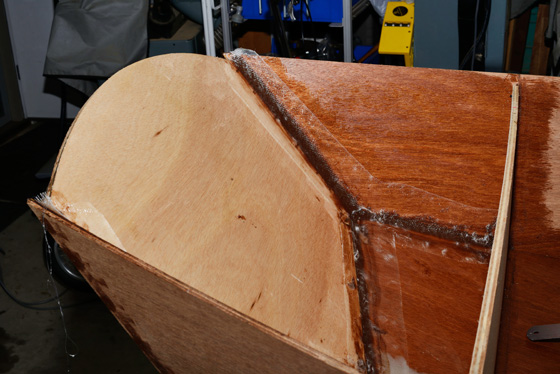 |
Before the filler sets lay the FG tape on the filler - this gives you a smooth join with the filler, FG tape and hull. Proceed with regular epoxy mix till the tape is whetted down, a brush is good for this. Leave to set and move to another section repeating the process. When the fillets are set(over night) mark the centre line from the mid seat to the transom - this will give the location for the skeg (like a mini keel), which is positioned toward the rear of the boat, and installed later (before the seat top is fixed into place). Step 5: External Seams and Fibreglass Tape 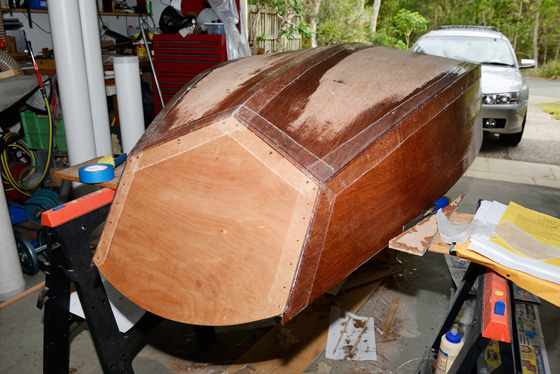 |
Once all the internal fillets are complete and the epoxy is set, the shell will need to be turned over and the external seams will need the same treatment - filled and glassed.
Note: One thing to remember FB tape doesn’t fold too well so be sure to give the edges a small radius of at least 6mm otherwise you will end up with air bubble under the tape. If practical, it's best to do all the outside seams in one session. You don’t need to wait till the epoxy sets.
Only mix a small amount at a time as it will set in the pot and become unusable. You can apply a fresh mix of epoxy over some that has begun to harden. You won’t get any peeling or flaking between the layers.
After making it this far, it is starting to look like a boat. In Part 2, we will install the seats, rub rails and oarlocks. I’ll look at the different options I have for finishing, as I haven’t decided yet. Can’t wait to launch it! I’ll keep you posted over the next couple of weeks.
Cheers,
Donovan. Some helpful resources: http://boatcraft.com.au/
Brisbane based firm supplying plans, kits, timber, equipment and expertise http://www.straydogboatworks.com/
Adelaide based firm specialising in a variety of classic wooden boat plans, kits, equipment and advise http://www.bateau2.com/howto/sg101.php
The link to the stitch and glue guide I consulted in conjunction with the plans supplied by Bateau |